Quick links
TLDR:
JavaScript email validation helps catch formatting mistakes in forms using regex, HTML5 validation, or libraries like validator.js. However, client-side checks only confirm format, not whether an email actually exists. For reliable results, combine browser validation with server-side checks or real-time verification using the EmailListVerify API.
—-
Invalid email addresses create downstream problems: signup confirmations never arrive, onboarding flows stall, and your database fills up with contacts you cannot use. J
avaScript email validation helps catch obvious mistakes early and give users immediate feedback, especially in signup forms, checkouts, and profile updates.
We’ll go over three practical ways to validate emails in JavaScript: regex, HTML5’s built-in validation, and validator.js.
You’ll also see where client-side checks stop being helpful and how to add real-time verification using the EmailListVerify API when you need stronger protection against fake or undeliverable addresses.
Key takeaways
- Use client-side validation to catch typos early and reduce failed form submissions.
- Regex, HTML5 validation, and validator.js confirm format, not deliverability.
- For higher-quality signups, add a server-side or API check to block disposable and invalid emails.
- Validate at the right time: on blur or on submit, not on every keystroke.
- Treat validation as a layered system: user experience first, enforcement on the backend.
Why validate emails in JavaScript?
JavaScript email validation acts as a first filter before data reaches your backend. It runs in the browser, allowing forms to catch obvious mistakes immediately instead of waiting for a server response.
Client-side validation helps in several ways.
Catch errors early
Users receive instant feedback when an email is incorrectly formatted instead of discovering the problem after submitting the form. Validating on blur or submit helps users fix issues quickly and keeps form flows smooth.
Filter invalid input before submission
Basic checks prevent malformed addresses such as john.doe@ or @example.com from reaching your server. This cuts out unnecessary requests and keeps clearly invalid data out of your system.
Improve validation without replacing backend checks
JavaScript can confirm that an email looks valid, but it can’t verify whether the mailbox exists or accepts mail. Server-side or API validation is still required for enforcement.
Works alongside HTML5 validation
Modern browsers already provide basic format checking with type=”email”. JavaScript can extend this by adding custom rules or error messages.
<input type=”email” id=”userEmail” required>
const emailInput = document.getElementById(‘userEmail’);
emailInput.addEventListener(‘input’, () => {
if (!isValidEmail(emailInput.value)) {
emailInput.setCustomValidity(‘Please enter a valid email address.’);
} else {
emailInput.setCustomValidity(”);
}
});
Client-side validation improves form usability, but it is only the first layer.
Validating emails with regular expressions (regex)
Regular expressions (regex) are the most common way to validate email format in JavaScript. They’re fast, flexible, and easy to run client-side, but the pattern needs to strike a balance between strict and practical validation.
What Are Regular Expressions? – RegEx Beginner Tutorial
What regex can (and can’t) do
Email formats are defined by RFC 5322, but fully matching the specification with regex isn’t realistic. Most implementations aim to catch obvious formatting mistakes rather than every theoretical edge case.
A widely used basic pattern looks like this:
const emailRegex = /^[^\s@]+@[^\s@]+\.[^\s@]+$/;
This checks for:
- characters before the @
- characters between @ and the final .
- a domain suffix such as .com or .org
It works well for general validation but still allows some invalid inputs, such as [email protected], and may accept development-only addresses like user@localhost.
Using a stricter pattern
If you need tighter format checks, a stricter regex can help:
const strictEmailRegex =
/^[a-zA-Z0-9._%+-]+@[a-zA-Z0-9.-]+\.[a-zA-Z]{2,}$/;
This version:
- restricts allowed characters in the local part
- requires a valid-looking domain
- blocks common malformed addresses
Even so, regex should focus on catching common mistakes, not enforcing the full email specification.
Don’t over-engineer regex
Attempting full RFC compliance usually creates patterns that are:
- difficult to read
- hard to maintain
- still imperfect in practice
A clear, maintainable pattern tested against real inputs is almost always the better choice. For deeper validation, use a library or verification service instead.
Test with real examples
Always test regex against realistic data.
Valid examples
Invalid examples
- plainaddress
- @missingusername.com
- [email protected]
Tools like regex101.com make it easy to verify behavior before deploying.
When regex is the right choice
Regex works best for quick client-side format checks and immediate user feedback. It should be treated as the first validation layer, not proof that an email address actually exists.
Using HTML5 built-in validation API
Modern browsers already include basic email validation through HTML5 form inputs. Using type=”email” applies built-in format checks automatically, with no JavaScript required.
How HTML5 email validation works
When an input uses the email type, the browser verifies that the value follows a general email structure ([email protected]) before allowing submission.
<form id=”signup-form”>
<label for=”email”>Email:</label>
<input type=”email” id=”email” name=”email” required>
<button type=”submit”>Submit</button>
</form>
The browser will:
- block submission if the field is empty or incorrectly formatted
- highlight invalid fields automatically
- display a default validation message
For many forms, this provides enough baseline validation without extra code.
Access validation state with JavaScript
You can extend native validation using the HTML5 validation API.
Use checkValidity() to test inputs programmatically:
const form = document.getElementById(‘signup-form’);
form.addEventListener(‘submit’, (e) => {
if (!form.checkValidity()) {
e.preventDefault();
}
});
Each input also exposes validation data:
const emailInput = document.getElementById(’email’);
if (!emailInput.validity.valid) {
console.log(emailInput.validationMessage);
}
This allows custom handling without writing regex logic yourself.
Customizing validation behaviour
HTML attributes control most validation rules:
- required: field must be filled
- pattern: apply custom regex rules
- minlength / maxlength: limit input length
Example restricting emails to one domain:
<input
type=”email”
pattern=”^[a-zA-Z0-9._%+-]+@example\.com$”
required>
To override browser error messages:
emailInput.addEventListener(‘input’, () => {
if (!emailInput.validity.valid) {
emailInput.setCustomValidity(
‘Please enter a valid @example.com email address’
);
} else {
emailInput.setCustomValidity(”);
}
});
When HTML5 validation is enough
Built-in validation works well for:
- basic format checks
- required fields
- simple domain restrictions
It keeps forms lightweight and dependency-free. However, it only validates structure. It cannot confirm whether an address exists or accepts mail.
Using third-party libraries (validator.js)
If you don’t want to maintain regex patterns, libraries like validator.js provide a cleaner approach to format validation.
Why use Validator.js
Validator.js exposes a single method for email validation:
const validator = require(‘validator’);
validator.isEmail(‘[email protected]’); // true
validator.isEmail(‘not-an-email’); // false
The library handles edge cases and evolving standards, avoiding fragile custom regex.
Customizing validation rules
isEmail() accepts configuration options:
validator.isEmail(‘John Doe <[email protected]>’, {
allow_display_name: true
});
Common options include:
- allow_display_name
- require_tld
- allow_ip_domain
- domain_specific_validation
This allows stricter or more flexible validation without rewriting logic.
Using validator.js in forms
Validator.js works in vanilla JS or frameworks like React:
function handleSubmit(event) {
event.preventDefault();
const email = event.target.email.value;
if (!validator.isEmail(email)) {
setError(‘Invalid email address’);
return;
}
}
Lightweight and practical
Validator.js adds roughly 20KB minified and has no external dependencies. Bundlers can tree-shake unused functions, keeping builds small.
It simplifies client-side format validation, but like HTML5 and regex, it only checks structure. Confirming whether an email is real requires verification beyond the browser.
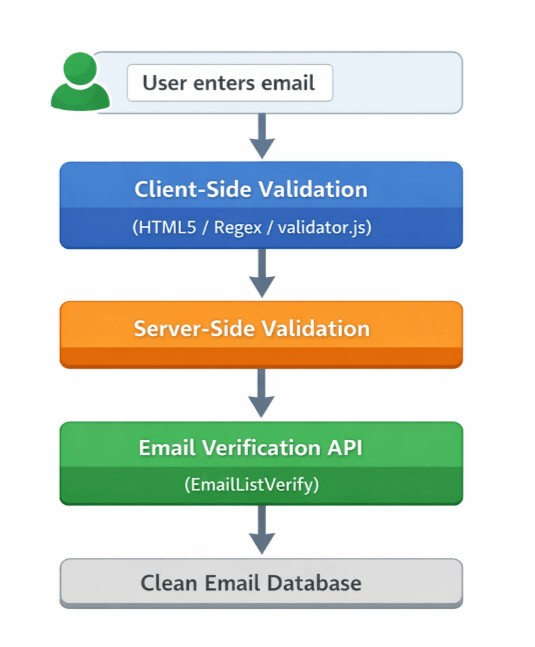
Layered email validation flow
Why client-side validation isn’t enough
Client-side validation is useful for catching formatting mistakes before a form is submitted. It helps users fix obvious errors early, but it cannot confirm whether an email address is real or deliverable. Even addresses that pass browser-based checks can still be invalid or unusable.
Here’s what client-side validation cannot detect.
Syntax checks don’t guarantee real addresses
Most client-side validation relies on regex or browser rules to confirm that an email looks correct. These checks catch missing @ symbols or invalid characters, but they cannot verify that a mailbox actually exists.
For example, [email protected] passes many format checks even though the domain is clearly a typo. Without deeper validation, addresses like this enter your system and fail later when emails are sent.
Disposable and role-based emails still pass
Client-side scripts cannot identify temporary or generic addresses such as [email protected] or [email protected]. These may pass format validation but often do not represent real users.
This can lead to:
- inaccurate analytics
- failed onboarding flows
- low-quality signups
Detecting these patterns requires server-side logic or an external verification service.
No domain or mailbox verification
Browsers cannot check DNS records or confirm whether a mail server accepts messages. An address like [email protected] may match a regex pattern even though the domain doesn’t exist.
Domain and mailbox checks require server-side processing or an API capable of querying mail infrastructure.
Client-side checks can be bypassed
Because validation runs in the browser, users can disable or modify it using developer tools. Client-side validation improves usability, but it cannot enforce data quality on its own.
Server-side validation remains the final authority.
Client-side validation improves the form experience, but it is only the first layer. To catch fake, disposable, or undeliverable emails, validation needs to continue after submission.
How to use EmailListVerify’s API for real-time checks
Once client-side validation is in place, you can verify emails in real time using the EmailListVerify API. This adds a second validation layer that checks whether an address is actually usable before storing it or triggering workflows.
Get your API key
Copy your API key from the API section in your EmailListVerify dashboard. This key authenticates all requests, so keep it private.
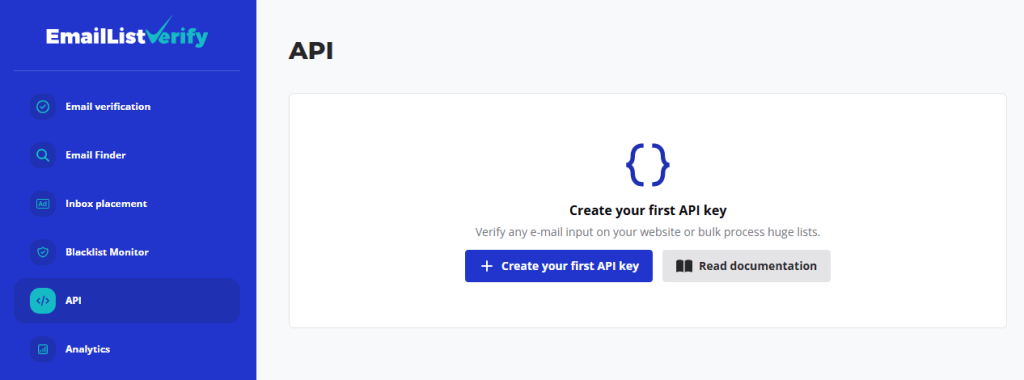
Don’t have an EmailListVerify account yet? You can create one for free.
[Get free API key]
Verify an email address
Real-time validation uses the verifyEmail endpoint:
Required parameters:
- secret: your API key
- email: the address to verify
Frontend example (fetch)
async function validateEmail(email) {
const apiKey = ‘YOUR_API_KEY’;
const url = `https://apps.emaillistverify.com/api/verifyEmail?secret=${apiKey}&email=${encodeURIComponent(email)}`;
try {
const response = await fetch(url);
const result = await response.text(); // API returns plain text
return result;
} catch (error) {
console.error(‘API call failed:’, error);
return null;
}
}
The API returns values such as:
- “ok” → valid address
- “invalid” → reject
- “disposable” → temporary email
- “catch-all” → domain accepts all mailboxes
Use these responses to decide how your form should proceed.
Server-side example (Node.js)
For production environments, call the API from your backend to keep the API key hidden:
const axios = require(‘axios’);
async function validateEmailServerSide(email) {
const apiKey = ‘YOUR_API_KEY’;
const url = `https://apps.emaillistverify.com/api/verifyEmail?secret=${apiKey}&email=${encodeURIComponent(email)}`;
try {
const response = await axios.get(url);
return response.data;
} catch (error) {
console.error(error.message);
return null;
}
}
Implementation tips
- Validate format first with HTML5 or regex before calling the API.
- Trigger verification on submit or onBlur instead of every keystroke.
- Handle “catch-all” responses carefully depending on your risk tolerance.
Real-time verification complements client-side checks by confirming deliverability after format validation.
Common mistakes in JavaScript email validation
Even experienced developers can trip up when writing JavaScript email validation logic. It’s easy to assume a simple regular expression or a quick string check will do the job. But email validation is more nuanced than it seems, and small oversights can lead to broken forms, missed leads, or frustrated users.
Here are the most common mistakes developers make and how to avoid them.
Relying on overly simple regular expressions
Many developers use basic regex patterns like this:
/^\S+@\S+\.\S+$/
It looks fine at first glance, but it fails to catch edge cases and allows invalid formats like [email protected], @domain.com, or [email protected]. These aren’t valid emails, yet this pattern would accept them.
Instead, use a more comprehensive pattern that aligns better with the HTML5 specification:
/^[a-zA-Z0-9._%+-]+@[a-zA-Z0-9.-]+\.[a-zA-Z]{2,}$/
Even this isn’t perfect, though. Email format rules are complex, and regex alone can’t cover every valid or invalid case. When possible, combine regex with server-side validation or use a dedicated validation library.
Ignoring internationalized email addresses
Email addresses can include non-ASCII characters, especially in international domains. For example:
- 用户@例子.公司.cn
- mü[email protected]
Basic regex patterns often reject these, even though they’re valid. If your app has a global user base, consider using libraries that support Internationalized Email Addresses (EAI), such as validator.js or external APIs that handle this complexity.
Not trimming input before validation
Users often copy and paste emails with extra spaces. If you validate the raw input, you might reject an otherwise valid address.
For example:
const email = ” [email protected] “;
Without trimming, this fails validation. Always normalize the input first:
const email = input.trim();
This small step prevents unnecessary validation failures.
Skipping domain-level validation
Syntax checks alone aren’t enough. An address like user@invalid_domain.com might pass regex, but the domain doesn’t exist. If you’re collecting emails for signups or newsletters, this matters.
Use domain validation tools or DNS lookups to check if the domain has MX records. This helps filter out typos and fake addresses.
Validating only on form submission
Waiting until the user hits “Submit” to validate the email can frustrate them. If the email is invalid, they’ve already filled out the rest of the form.
Instead, validate in real time or on blur. Doing so gives immediate feedback and improves the user experience. Just make sure your validation doesn’t get too aggressive or block valid but uncommon formats.
Assuming HTML5 validation is enough
HTML5 offers built-in email validation with the type=”email” attribute. While helpful, it’s not foolproof. Browsers interpret the spec differently, and some valid emails may be rejected or accepted inconsistently.
Always back up client-side checks with JavaScript validation. This gives you more control and consistency across browsers.
Avoiding these common mistakes can make your email validation more reliable and user-friendly.
JavaScript validation checklist key points
Use this quick checklist to confirm your email validation setup covers the basics.
Format validation
☐ Use HTML5 type=”email” for baseline format validation
☐ Add regex or a validation library (such as validator.js) for additional checks
☐ Avoid overly complex regex patterns that are hard to maintain
Input handling
☐ Trim whitespace before validating (input.trim())
☐ Consider converting domains to lowercase for consistency
☐ Validate on blur or submit, not on every keystroke
User experience
☐ Provide clear validation messages
☐ Show errors immediately after blur or form submission
☐ Avoid blocking uncommon but valid email formats
Data quality protection
☐ Validate again on the server side
☐ Block disposable or temporary email providers if necessary
☐ Verify domain or MX records when collecting important addresses
Advanced validation
☐ Use an API (such as EmailListVerify) to confirm deliverability
☐ Handle catch-all domains according to your risk tolerance
☐ Log validation failures to monitor signup quality
Conclusion
JavaScript email validation works best as a layered process.
Use HTML5 or regex to catch obvious formatting issues in the browser. Validate again on the server to prevent bypassing client-side checks. Then add real-time verification if you need to confirm addresses are deliverable and not disposable.
A solid setup looks like this:
- basic format checks with HTML5 or regex
- client-side feedback for usability
- server-side validation for reliability
- API verification for real mailbox checks
No single method is enough on its own. Combining them helps keep forms user-friendly while protecting data quality and deliverability.
Join Our Monthly Newsletter
Learn how to improve email deliverability and clean your email lists with and more.